How to Check Your Motherboard on PC?
Your motherboard is one of the most important parts of your computer, but most people don’t even know which one they have. Whether you’re planning an upgrade, troubleshooting, or just curious, it’s useful to know how to check your motherboard on your PC.
At Technorth.online, we guide tech beginners and enthusiasts through simple yet detailed tutorials — like this one — to help you get more from your hardware.
Quick Ways to Check Your Motherboard:
- Use Command Prompt (CMD):
Press Windows + R, type cmd, and then type:
wmic baseboard get product,manufacturer
This will show your motherboard model and brand. - Use Third-party Software:
Tools like CPU-Z, Speccy, or HWiNFO can display all motherboard details in one place. - Physically Check Inside Your PC Case:
The model name is usually printed on the motherboard itself, near the RAM or CPU socket.
Planning to upgrade your gaming rig? Don’t miss our detailed guide: What is the best motherboard for gaming in 2025
What Does Motherboard Do?
A motherboard is basically the central nervous system of your PC. Every major component — CPU, RAM, GPU, storage, and even cooling systems — connects to it.
Key Functions of a Motherboard
- Power Distribution: Delivers power to the CPU, RAM, and other parts.
- Communication Hub: Lets all components talk to each other.
- Expansion & Upgrades: Provides slots for adding graphics cards, RAM, and SSDs.
- BIOS/UEFI: Controls basic system settings before your OS starts.
Without a motherboard, your PC is just a box of parts — it ties everything together and makes your system run smoothly.
How to Install Motherboard?
Installing a motherboard might seem tricky, but with the right steps and a bit of patience, anyone can do it — even first-timers.
Tools You’ll Need:
- Screwdriver (preferably magnetic)
- Anti-static wristband (optional but safe)
- User manual for both motherboard and PC case
Step-by-Step Installation Guide
1. Prep the Case
Remove side panels and check for pre-installed standoffs.
2. Install I/O Shield
Align and snap the metal I/O shield into the back of the case.
3. Place the Motherboard
Align the board with the standoffs and I/O shield. Screw it down gently but firmly.
4. Connect Power Cables
Attach 24-pin and 8-pin power connectors from the PSU.
5. Plug in Components
Add RAM, CPU, CPU cooler, GPU, and storage devices.
Want to learn more about gaming setups and PC builds? Check our Category section on Technorth.online for detailed guides and tutorials.
How to Find My Motherboard Model Windows 10:
If you’re using Windows 10, you don’t have to open your PC to find your motherboard model.
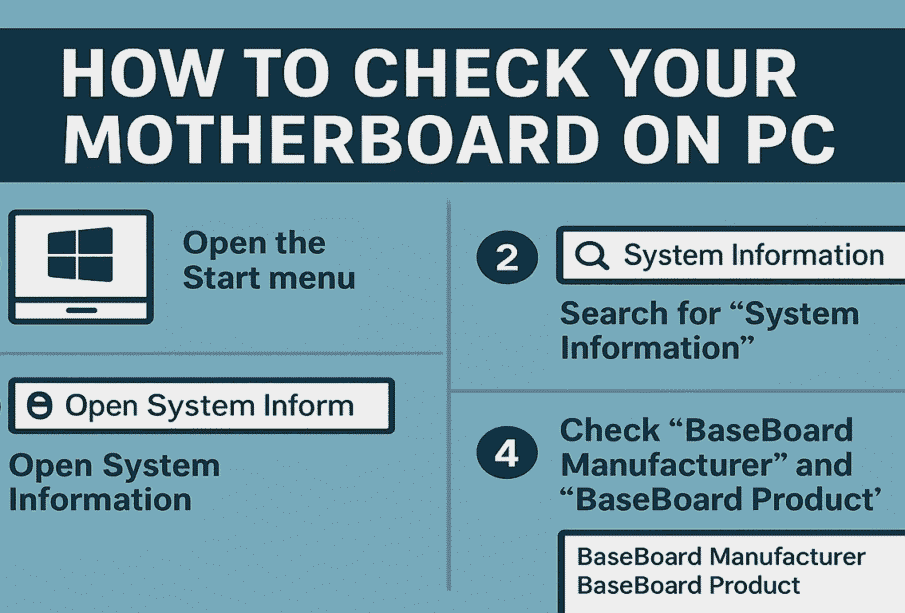
Method 1: Using System Info:
- Press Windows + R, type msinfo32, and hit Enter.
- In the System Summary, look for “BaseBoard Product” and “BaseBoard Manufacturer”.
That’s your motherboard model and brand.
Method 2: Use Command Line:
Open Command Prompt and type:
wmic baseboard get product,manufacturer,version,serialnumber
This will give you complete info on your board.
Method 3: Use CPU-Z or HWiNFO:
These free tools are fast, easy, and offer more detailed information than built-in Windows tools.
Still confused? You can always Contact Us at Technorth.online and we’ll help you figure it out.
Final Thoughts:
Knowing your motherboard model and how it works is essential for upgrading, troubleshooting, or building your PC. Whether you’re a gamer or a casual user, understanding your motherboard helps you make smarter decisions.
At Technorth.online, we’re all about making tech simple, especially for those who want to explore DIY PC builds or performance upgrades. Want more tutorials and how-tos? Don’t forget to explore our full Category for motherboard-related content.
And if you’re planning a gaming build, be sure to check out What is the best motherboard for gaming in 2025 — our expert pick list for the latest generation of gamers.